fbpx

Power Steering | Electric Assist | Snowmobile Upgrade

NEW PRODUCT

Fall 2024

Power Steering | Electric Assist | Snowmobile Upgrade

WHY UPGRADE?

Power steering offers several advantages for snowmobile riders, especially in challenging snowy conditions:

  • Improved Maneuverability: Power steering makes it easier to turn the snowmobile, particularly at low speeds or in tight spaces. This is especially helpful when navigating through trees, around obstacles, or in confined areas.


  • Reduced Rider Fatigue: The physical effort required to turn a snowmobile without power steering can be tiring, especially during long rides or in demanding conditions. Power steering reduces this strain, allowing riders to enjoy their experience for longer periods.


  • Enhanced Control: Power steering provides more precise control over the snowmobile’s direction, making it easier to maintain a stable course, especially in uneven terrain or high winds.


  • Increased Safety: By reducing rider fatigue and improving control, power steering can contribute to increased safety on the trail. It can help prevent accidents caused by loss of control or excessive strain on the rider.

NOW AVAILABLE!

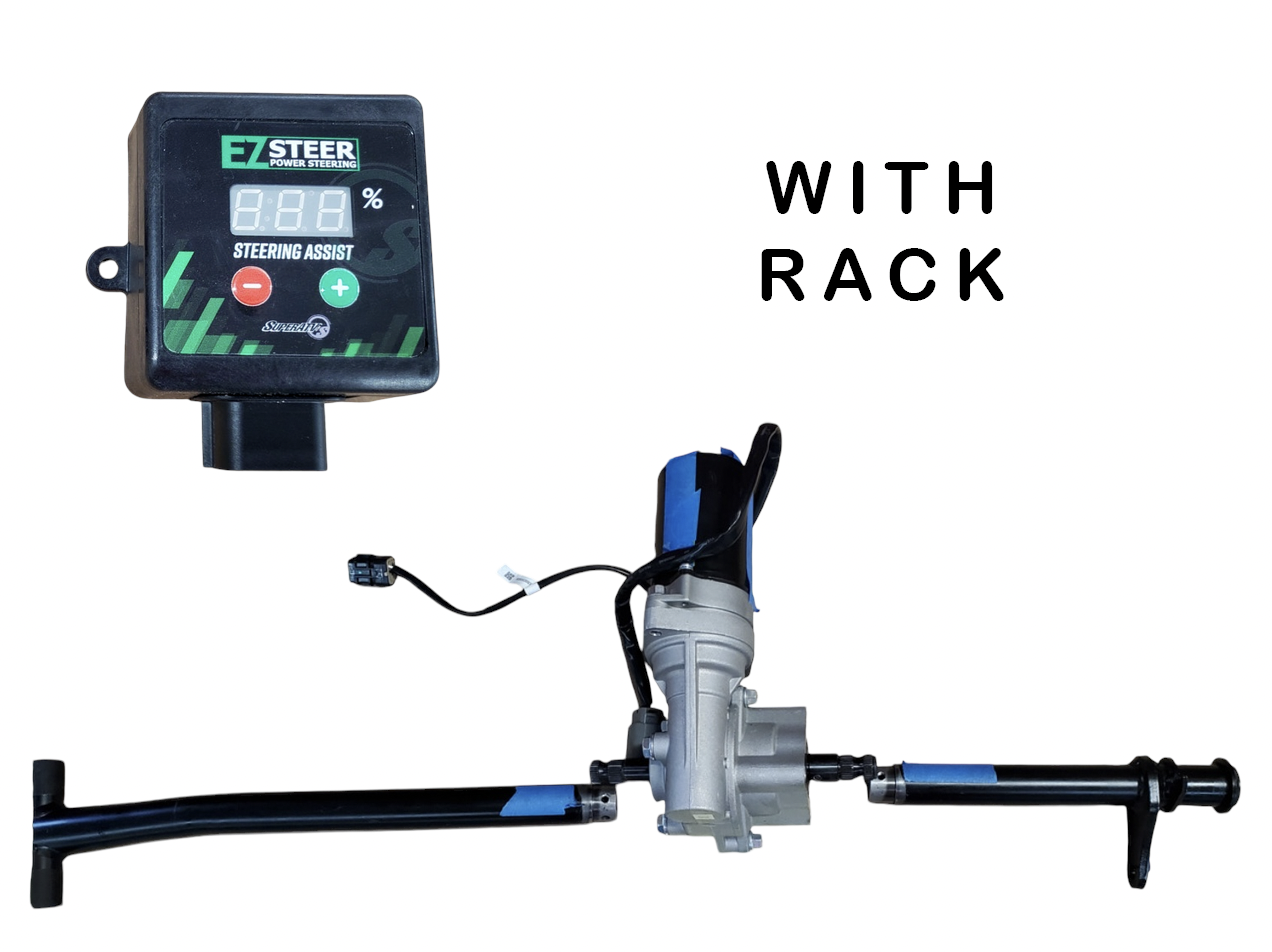
Power Steering Electric Assist Snowmobile Upgrade for

ski-doo 850/600 GEN 4-5 | 2 stroke

(with rack steering)

Snowmobile Shocks | power steering with rack

Video of How to Install Power Steering for ski-doo 850/600 Gen 4-5 | 2 stroke

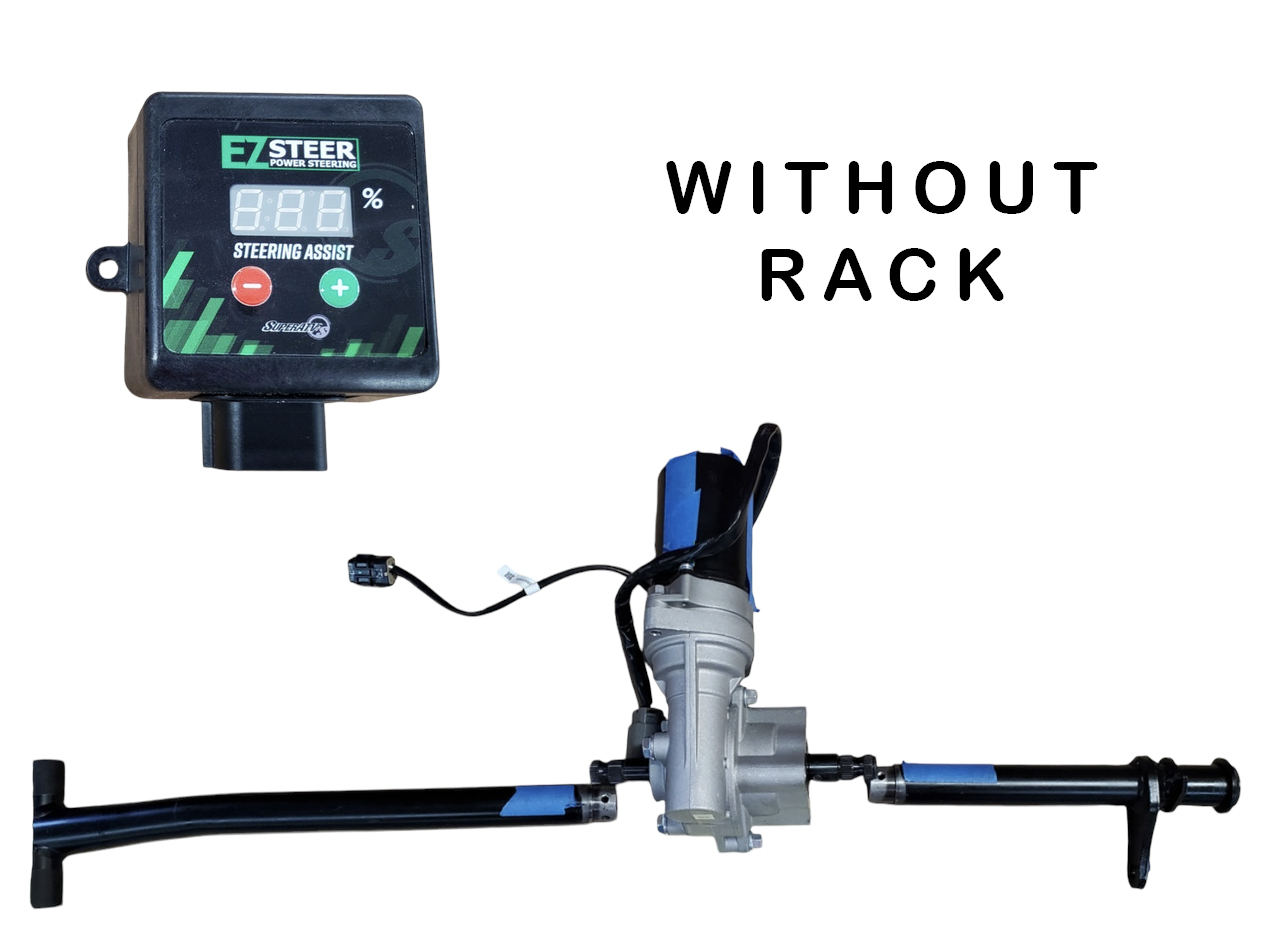
Power Steering Electric Assist Snowmobile Upgrade for

ski-doo 850/600 GEN 4-5 | 2 stroke

(without rack steering)

Snowmobile Shocks | power steering without rack

Video of How to Install Power Steering for ski-doo 850/600 Gen 4-5 | 2 stroke

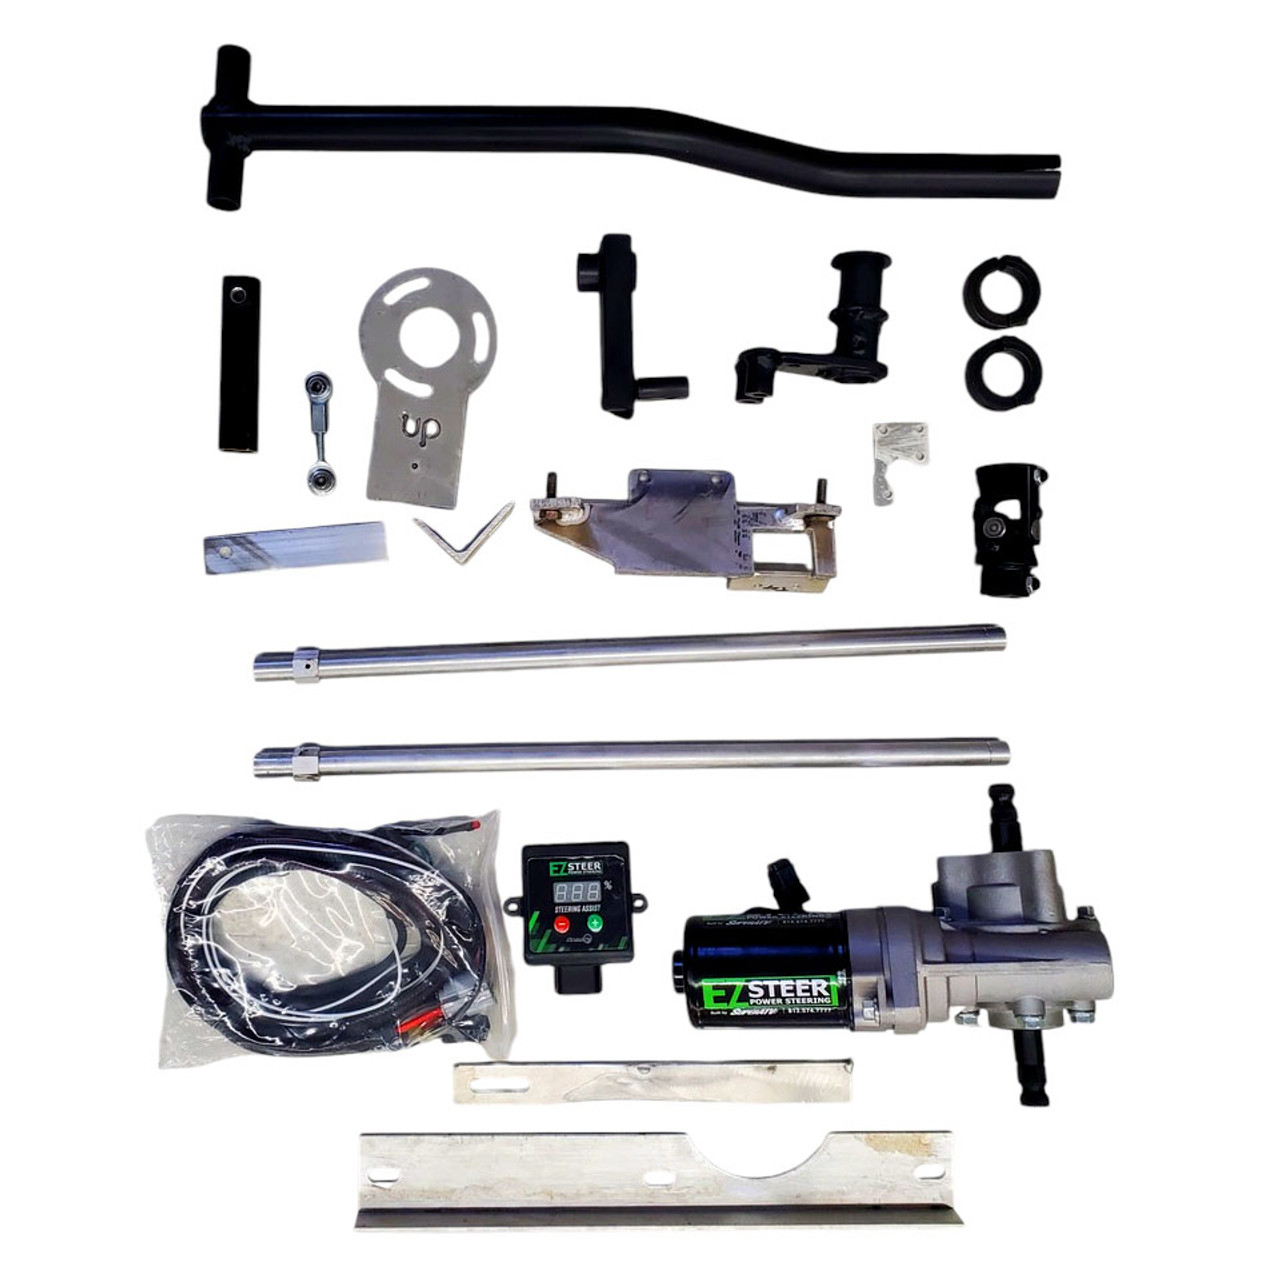
Power Steering Electric Assist Snowmobile Upgrade for

ski-doo 900R GEN 4-5 | 4 stroke

(turbo)

Parts-power-steering-ski-doo-900R

Video of How to Install Power Steering for ski-doo 900R Gen 4-5 | 4 stroke (turbo)

Power Steering Electric Assist Snowmobile Upgrade for

ski-doo 900 ACE GEN 4-5 | 4 stroke

(non turbo)

Snowmobile Shocks | non turbo 86810.1725744395

Video of How to Install Power Steering for ski-doo 900 ACE Gen 4-5 | 4 stroke (non turbo)

Power Steering | Electric Assist | Snowmobile Upgrade

For Questions or Tech Support Call or Text available from 10:00 AM to 12 midnight eastern standard time.

Snowmobile Shocks | snowmobileshocks logo

HOW TO INSTALL

Power Steering | Electric Assist | Snowmobile Upgrade

ski-doo 600/850 GEN 4-5 | 2 stroke (with rack)

Video of How to Install Power Steering for ski-doo 850/600 Gen 4-5 | 2 stroke

Power Steering Assist Installation Guide for Ski-Doo Gen 4 & 5 850/600 E-TEC

Introduction

This guide provides step-by-step instructions for installing a power steering assist kit on a Ski-Doo Gen 4 or 5 850/600 E-TEC snowmobile. Before beginning, ensure you have all necessary tools and components.

Tools and Materials Needed

  • Basic hand tools (screwdrivers, wrenches, etc.)
  • Chop saw
  • Welding equipment
  • Electrical tape
  • Wire connectors
  • Drill
  • Safety glasses and gloves

Procedure

1. Preparation:

  • Remove the handlebars, dashboard, and hood.
  • Disconnect the exhaust springs and remove the muffler.
  • Be cautious when removing the heat guard as it’s fragile.

2. Steering Post Removal and Modification:

  • Disconnect the steering post from the bearing and rack and pinion.
  • Cut the steering shaft to the specified lengths using a chop saw.
  • Weld the couplers onto the cut shaft at the designated points.

3. Reassembly and Motor Installation:

  • Reassemble the lower portion of the shaft with washers and a plastic carrier.
  • Install the adjustable dog link.
  • Mount the motor and align it with the steering shaft.
  • Secure the motor with a brace and bicycle brackets.

4. Final Touches and Wiring:

  • Install the safety clamp on the shaft to prevent separation.
  • Mount the ECU and connect the servo sensor wire and power wires.
  • Ensure the power valve clears the motor.
  • Connect the white wire to a power source that’s on when the ignition is on and the engine is running.
  • Connect the ground wire to a suitable ground point.
  • Modify the muffler by creating a dent to clear the motor.

5. Alignment and Testing:

  • Align the front end of the snowmobile and ensure the steering post is straight.
  • Check the alignment of the handlebars and the dog bone.
  • Test the power steering assist system to ensure it functions correctly.

Important Notes:

  • Battery Disconnection: Disconnect the battery’s negative terminal before starting the installation.
  • Smart Shock Sleds: Follow specific procedures for alignment and resetting the system.
  • Muffler Modification: Be careful when modifying the muffler to avoid damaging it.
  • Wiring: Double-check all connections to ensure proper functionality.
  • Professional Installation: If you’re unsure about any step, consult a qualified technician.

By following these steps and taking necessary precautions, you can successfully install the power steering assist kit on your Ski-Doo snowmobile.

Power Steering Electric Assist Snowmobile Upgrade for

ski-doo 850/600 GEN 4-5 | 2 stroke

(with rack steering)

HOW TO INSTALL

Power Steering | Electric Assist | Snowmobile Upgrade

ski-doo 600/850 GEN 4-5 | 2 stroke (without rack)

Video of How to Install Power Steering for ski-doo 600/850 Gen 4-5 | 2 stroke

Power Steering Assist Installation Guide for Ski-Doo Gen 4 & 5 850/600 E-TEC

Introduction

This guide provides step-by-step instructions for installing a power steering assist kit on a Ski-Doo Gen 4 or 5 850/600 E-TEC snowmobile. Before beginning, ensure you have all necessary tools and components.

Tools and Materials Needed

  • Basic hand tools (screwdrivers, wrenches, etc.)
  • Chop saw
  • Welding equipment
  • Electrical tape
  • Wire connectors
  • Drill
  • Safety glasses and gloves

Procedure

1. Preparation:

  • Remove the handlebars, dashboard, and hood.
  • Disconnect the exhaust springs and remove the muffler.
  • Be cautious when removing the heat guard as it’s fragile.

2. Steering Post Removal and Modification:

  • Disconnect the steering post from the bearing and rack and pinion.
  • Cut the steering shaft to the specified lengths using a chop saw.
  • Weld the couplers onto the cut shaft at the designated points.

3. Reassembly and Motor Installation:

  • Reassemble the lower portion of the shaft with washers and a plastic carrier.
  • Install the adjustable dog link.
  • Mount the motor and align it with the steering shaft.
  • Secure the motor with a brace and bicycle brackets.

4. Final Touches and Wiring:

  • Install the safety clamp on the shaft to prevent separation.
  • Mount the ECU and connect the servo sensor wire and power wires.
  • Ensure the power valve clears the motor.
  • Connect the white wire to a power source that’s on when the ignition is on and the engine is running.
  • Connect the ground wire to a suitable ground point.
  • Modify the muffler by creating a dent to clear the motor.

5. Alignment and Testing:

  • Align the front end of the snowmobile and ensure the steering post is straight.
  • Check the alignment of the handlebars and the dog bone.
  • Test the power steering assist system to ensure it functions correctly.

Important Notes:

  • Battery Disconnection: Disconnect the battery’s negative terminal before starting the installation.
  • Smart Shock Sleds: Follow specific procedures for alignment and resetting the system.
  • Muffler Modification: Be careful when modifying the muffler to avoid damaging it.
  • Wiring: Double-check all connections to ensure proper functionality.
  • Professional Installation: If you’re unsure about any step, consult a qualified technician.

By following these steps and taking necessary precautions, you can successfully install the power steering assist kit on your Ski-Doo snowmobile.

Power Steering Electric Assist Snowmobile Upgrade for

ski-doo 850/600 GEN 4-5 | 2 stroke

(without rack steering)

HOW TO INSTALL

Power Steering | Electric Assist | Snowmobile Upgrade

ski-doo 900R GEN 4-5 | 4 stroke (turbo)

Video of How to Install Power Steering for ski-doo 900R GEN 4-5 | 4 stroke (turbo)

Ski-Doo Gen 4 & 5 900R Turbo Power Steering Assist Kit Installation Guide

By Brad from Brad’s AC Performance

Tools Required:

  • Basic hand tools (screwdrivers, wrenches, etc.)
  • Chop saw
  • Welding equipment
  • Electrical tape
  • Wire connectors
  • Drill
  • Safety glasses and gloves

Preparation:

  1. Disconnect the battery’s negative terminal.
  2. Remove the hood, intercooler, and steering rack and pinion.
  3. Clean the cleared area.

Motor and Unit Assembly:

  1. Locate the designated area under the turbo for motor placement.
  2. Gather the kit parts and identify those reused from your original setup.
  3. Mount the potentiometer bracket with the provided screws.
  4. Grind the potentiometer edge to clear screws for proper installation.
  5. Assemble the motor unit, ensuring tight connections and parallel placement of the rod ends for correct potentiometer reading.
  6. Test fit the unit for proper placement and tie rod alignment.

Motor Installation and Clearance:

  1. Modify the turbo cover for clearance with the motor (if necessary).
  2. Omit the factory shim plate if it interferes with the belly pan on your sled.
  3. Secure the modular unit to the motor with the Allen screw (ensure proper locking).
  4. Re-tighten the Allen screw after checking for movement. Blue Loctite is recommended.
  5. Install the bracket on the assembled unit.
  6. Align the bracket with the 6 and 12 o’clock positions on the motor housing.

Additional Assembly:

  1. Install the washer beneath the potentiometer’s connecting heim joint.
  2. Mount the support rod on the bracket during installation.
  3. Refer to the provided instruction sheet for bolt identification and placement.
  4. Secure the bracket with the stainless steel Allen bolt and matching nut.
  5. Attach the brace holding the motor and potentiometer using the provided screws.
  6. Mount the brace to the bulkhead using the designated bolts and nuts.
  7. Install the brace to the chassis using the provided flare nuts and locking nuts.
  8. Secure the bracket underneath the belly pan using the designated nuts.

Steering Post and Alignment:

  1. Install the potentiometer wire before bolting in the motor.
  2. Tighten the motor’s mounting nuts.
  3. Install the tie rods with left-handed threads on the motor side and right-handed threads on the spindle side.
  4. Apply grease to the left-handed heim joints for a tighter fit.
  5. Do not adjust the tie rods at this stage. Alignment will be done later.

Safety and Adjustments:

  1. Ensure the U-joint doesn’t contact the water return line for the turbo at full turn.
  2. Adjust the tie rod if clearance with the water return line is an issue.
  3. Aim for nine threads showing on both sides of the tie rod for proper adjustment.
  4. Roughly check the toe by measuring 41 ½ inches between the ski centers.
  5. Install the control box with the locking collar to prevent handlebar separation.
  6. Tighten the Allen screws on the locking collar, leaving a ¼ inch gap to the nun.

Steering Post Assembly:

  1. Choose the appropriate steering post length based on your preference.
  2. Secure the U-joint to the steering post using the set screws.
  3. Tighten the Allen screws on the steering pitman arm for a secure fit.
  4. Test the handlebar alignment by turning the post to the stops and checking for twisting.
  5. Mark the Double D post with a punch and drill a hole for the lynch pin (3/16 to 5/16 size).
  6. Install the 5/16 grade 8 bolt as the lynch pin.

Electrical Connections:

  1. Mount the ECU to the right-hand side intercooler support with the plugs facing the steering shaft.
  2. Route the wires to the designated location and create a secure holder (not finalized yet).
  3. Run the other set of wires under the nun for connection.
  4. Connect the white wire (excer wire) to a 12-volt power source using a blue Scotch Lock.
  5. Connect the other wire to the cell solenoid using a crimped connector.
  6. Ground the unit at the footrest.

Intercooler Fan Adjustments (for 900r Turbo):

  1. Grind the motor mounting bolts for additional clearance with the intercooler fan (if necessary).
  2. Use a screwdriver to carefully bend the aluminum brace at the fan’s bottom for additional clearance.
  3. Adjust the motor’s rotation for optimal clearance.

Final Touches and Testing:

  1. Reinstall the hood and ensure the gauge is not connected for initial testing.

Power Steering Electric Assist Snowmobile Upgrade for

ski-doo 900R GEN 4-5 | 4 stroke

(turbo)

HOW TO INSTALL

Power Steering | Electric Assist | Snowmobile Upgrade

ski-doo 900 ACE GEN 4-5 | 4 stroke (non turbo)

Video of How to Install Power Steering for ski-doo 900 ACE Gen 4-5 | 4 stroke non turbo

How to Install a Power Steering Conversion Kit on Your Ski-doo Gen 4 or 5

Disclaimer: This guide is intended for experienced mechanics. Always refer to your specific vehicle’s manual and consult a professional if needed.

Tools and Materials:

  • Sawzall with a metal-cutting blade
  • Drill
  • Wrenches
  • Screwdrivers
  • Safety glasses
  • Gloves
  • Power steering conversion kit (includes motor, ECU, wiring harness, hardware, and possibly a modified steering post)

Step-by-Step Instructions:

  1. Prepare the Sled:

    • Remove the handlebars and riser.
    • Remove the plastic cover under the gas cap and the door behind it.
    • Unplug the electrical connectors.
  2. Cut the Steering Post:

    • Using a sawzall, cut the steering post as shown in the video.
    • Remove the cut section of the steering post.
  3. Install the Modified Steering Post (if applicable):

    • If you’re using a modified steering post, align it with the remaining portion of the original post.
    • Weld the modified section to the original post, ensuring proper alignment.
    • Drill a 5/16″ hole in the chassis as indicated in the instructions.
    • Install the provided aluminum bracket and bolt it in place.
  4. Install the Power Steering Motor:

    • Mount the motor to the chassis using the provided clamp and hardware.
    • Align the motor’s coupler with the steering post’s coupler.
    • Secure the couplers with an Allen screw and blue Loctite.
  5. Install the ECU:

    • Mount the ECU to the provided bracket using the supplied hardware.
    • Secure the bracket to the sled’s frame.
  6. Connect the Wiring Harness:

    • Connect the wiring harness to the motor, ECU, and other components according to the instructions.
    • Route the wiring harness securely, avoiding any potential pinch points.
  7. Adjust the Steering Effort:

    • Use the adjustment box on the ECU to fine-tune the steering effort to your preference.
  8. Test and Finalize:

    • Start the engine and test the power steering system.
    • Check for any leaks or loose connections.
    • After 100 miles of use, re-torque all bolts and Allen screws.

Additional Tips:

  • If you’re unsure about any step, consult a professional mechanic.
  • Always wear safety gear when working on your sled.
  • Take your time and double-check everything before proceeding.

Note: For detailed instructions and visual aids, refer to the video and the included documentation in your power steering conversion kit.

Power Steering | Electric Assist | Snowmobile Upgrade

ski-doo 900 ACE GEN 4-5 | 4 stroke (non turbo)